eSIM Installation Guide

Installing your SimitEasy eSIM is quick and easy. Whether you’re using an iPhone or an Android device, you can complete the setup in just a few minutes using either the QR code or manual installation details provided after purchase.

Our step-by-step instructions will help you get connected before you travel, so you’ll have instant mobile data as soon as you arrive at your destination.


Before You Begin

Before installing your eSIM, make sure you have the following:

  • A stable Wi-Fi or mobile internet connection.
  • An eSIM-compatible smartphone or tablet.
  • An unlocked device that supports third-party eSIM profiles.
  • Your SimitEasy QR code or manual activation details.

If you’re unsure whether your device supports eSIM, please visit our Compatible Devices page before purchasing.


Check if Your Device is Carrier Unlocked

Your device must be carrier unlocked to use a SimitEasy eSIM. If it’s locked to a specific mobile operator, you won’t be able to install or activate an international eSIM.

On iPhone or iPad

  1. Open Settings.
  2. Tap General.
  3. Select About.
  4. Scroll down to Carrier Lock.

If it says “No SIM Restrictions”, your device is unlocked and ready to use with SimitEasy.

If another message appears, please contact your mobile carrier to request an unlock before purchasing an eSIM.
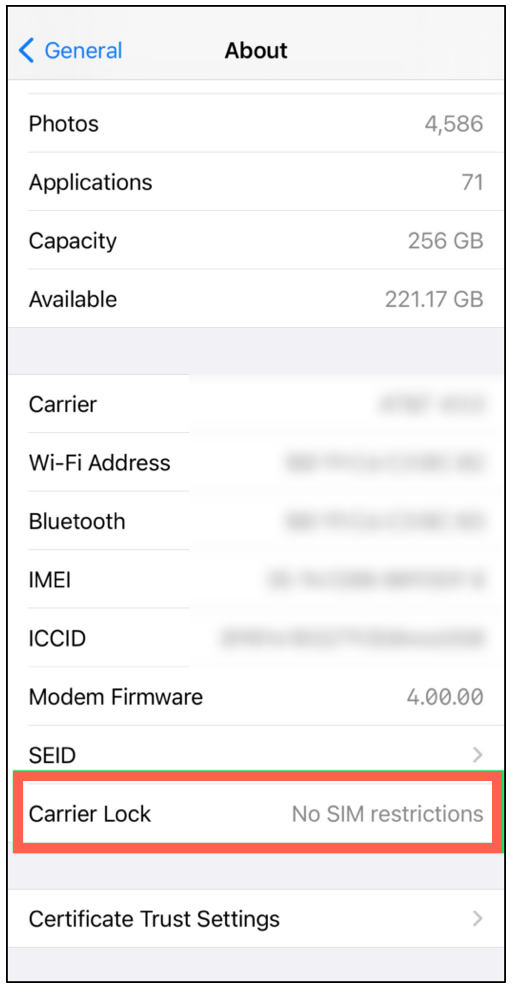
If your iPhone displays “No SIM Restrictions” under Carrier Lock, your device is unlocked and ready to use with a SimitEasy eSIM.

If your device is locked to a mobile carrier, you’ll need to contact your carrier to request an unlock before using an eSIM from another provider. Eligibility for unlocking depends on your carrier’s policies and your account status.

Please note that devices purchased through a carrier on a payment plan may remain locked until all outstanding payments have been completed. Devices purchased directly from Apple are typically unlocked by default.

Check Carrier Lock Status on Android Devices

The steps for checking whether an Android device is carrier unlocked may vary depending on the manufacturer and Android version. However, the general process is similar across most devices.

  1. Open Settings on your Android phone.
  2. Go to Connections, Network & Internet, or Mobile Network (the menu name may differ depending on your device).
  3. Select SIM Manager, Mobile Networks, or a similar option.
  4. Look for Network Operators or Choose Network and disable Automatic Selection if prompted.
  5. If your phone is able to detect and display multiple available mobile networks, it is usually a good indication that the device is unlocked.

For a more reliable confirmation, insert a SIM card from a different carrier. If your phone connects to the network and you can use mobile data or make calls, your device is unlocked.

If you’re still unsure, we recommend contacting your mobile carrier. They can confirm whether your device is locked and advise if it is eligible to be unlocked. Please note that devices purchased through a carrier on an installment or financing plan may remain locked until all contractual obligations have been fulfilled.

Check if Your Device Supports eSIM

Not sure if your phone supports eSIM? The quickest way to find out is by checking your device’s information using a simple dial code.

This method works on both iPhone and Android devices.


Step 1

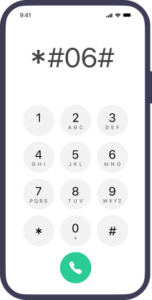
Open the Phone app on your device and launch the dial pad.

Enter the following code:

*#06#

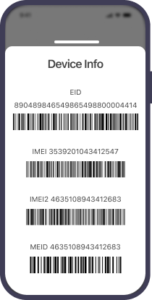
Your device information will appear automatically.

Step 2

Review the information displayed on your screen.

Depending on your device, you’ll see details such as your IMEI numbers and other hardware identifiers.

Step 3

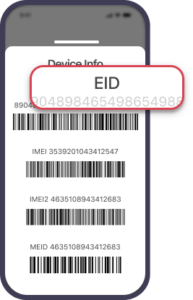
If an EID (Embedded Identity Document) number is listed, your device supports eSIM technology and is compatible with SimitEasy.

If no EID is displayed, your device may not support eSIM. You can also verify compatibility on our Compatible Devices page.

Install on iPhone & iPad

Installing a SimitEasy eSIM on an Apple device only takes a few minutes. We recommend using the QR Code method whenever possible, as it’s the fastest and easiest option.


Install Using a QR Code

Step 1

After purchasing your eSIM, you’ll receive a QR Code by email and in your SimitEasy account.

You can install it in one of two ways:

Option 1

Open the Camera app on your iPhone or iPad and scan the QR Code. When the notification appears, tap Add eSIM to begin installation.

Option 2

Open:

Settings → Cellular (or Mobile Service) → Add eSIM → Use QR Code

Then scan the QR Code provided with your order.


Using iOS 17 or Later

If your QR Code is displayed on the same iPhone you’re installing the eSIM on, you don’t need another device.

Simply:

  1. Take a screenshot of the QR Code.
  2. Open Settings → Cellular → Add eSIM → Use QR Code.
  3. Tap Open Photos.
  4. Select the screenshot containing your QR Code.

Your iPhone will automatically recognize the QR Code and continue the installation process.


Manual Installation

If you’re unable to scan the QR Code, you can install your eSIM manually.

Go to:

Settings → Cellular → Add eSIM → Use QR Code

Then tap Enter Details Manually at the bottom of the screen.

Enter the following information exactly as provided in your SimitEasy order confirmation:

  • SM-DP+ Address
  • Activation Code

Tap Next and wait while your iPhone downloads and installs the eSIM profile. Installation usually completes within a few minutes, although it may take a little longer depending on your internet connection.

Once the installation is complete, tap Done and continue with the setup.


Step 2

When the installation begins, your iPhone will display a confirmation screen asking you to activate the eSIM.

Tap Continue and allow your device a few minutes to complete the installation.

Once finished, your SimitEasy eSIM will appear in your Cellular settings and will be ready for configuration.


Step 3

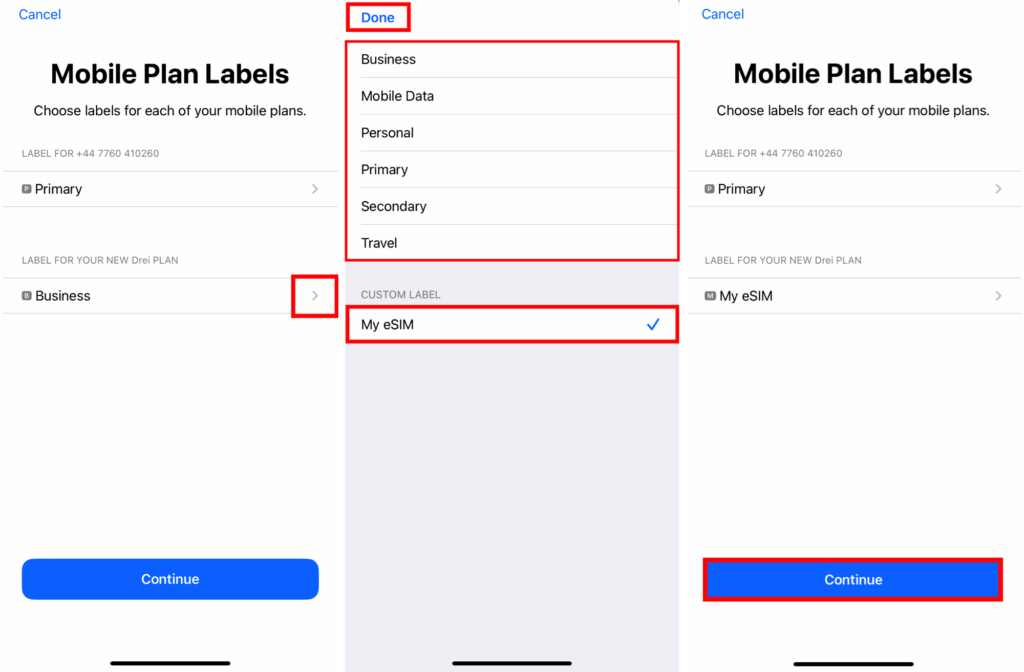
After the eSIM has been successfully installed, you can assign it a custom label such as:

  • SimitEasy
  • Travel
  • Europe
  • Vacation

Using labels makes it easier to identify your eSIM if you have multiple SIM profiles installed on your device.

Next, choose your preferred SIM settings:

  • Keep your primary SIM for calls and text messages.
  • Select your SimitEasy eSIM as the default line for Mobile Data.
  • Enable Data Roaming for your SimitEasy eSIM.

Your device is now ready to connect automatically when you arrive at your destination.

Вот более профессиональная версия в стиле SimitEasy, без повторения оригинального текста.


Step 4

Configure Your SIM Preferences

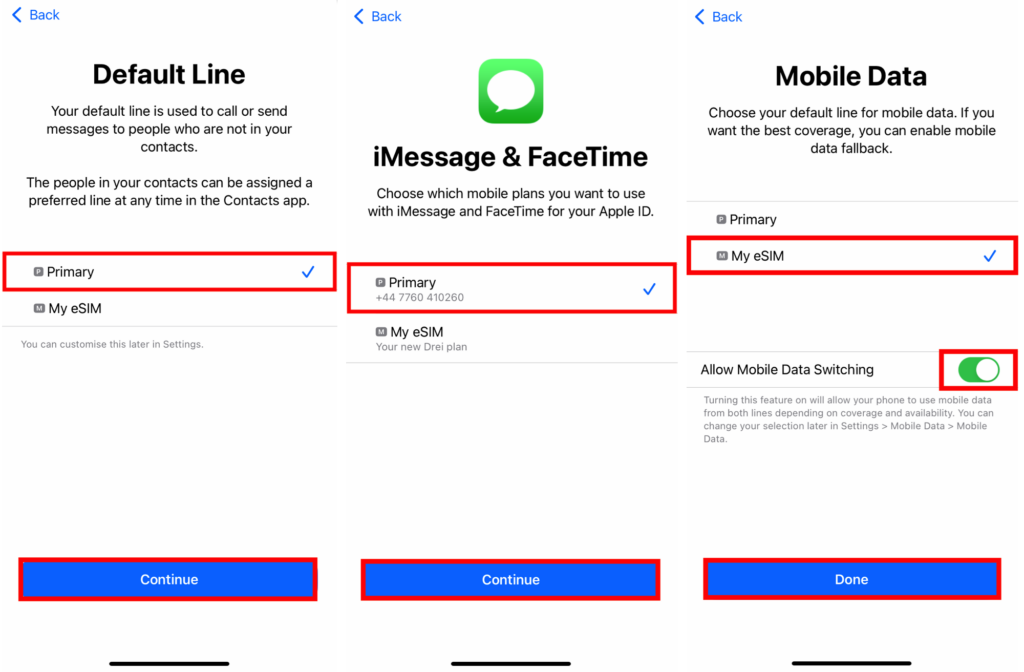
After your eSIM has been installed, your iPhone will ask how you’d like to use each SIM.

For the best experience, we recommend the following settings:

  • Default Line: Select Primary if you want to continue using your regular phone number for calls and text messages.
  • iMessage & FaceTime: Choose Primary to keep your existing Apple services linked to your main number.
  • Mobile Data: Select your SimitEasy eSIM as the preferred line for mobile data.

You can also enable Allow Mobile Data Switching if you want your iPhone to automatically switch between your SIMs when network coverage changes.

Tip: If you’ve installed your eSIM before your trip and don’t want your data plan to activate yet, keep your Primary SIM selected for Mobile Data. Switch to your SimitEasy eSIM only when you’re ready to start using your plan at your destination.

Step 5

Enable Your eSIM When You Arrive

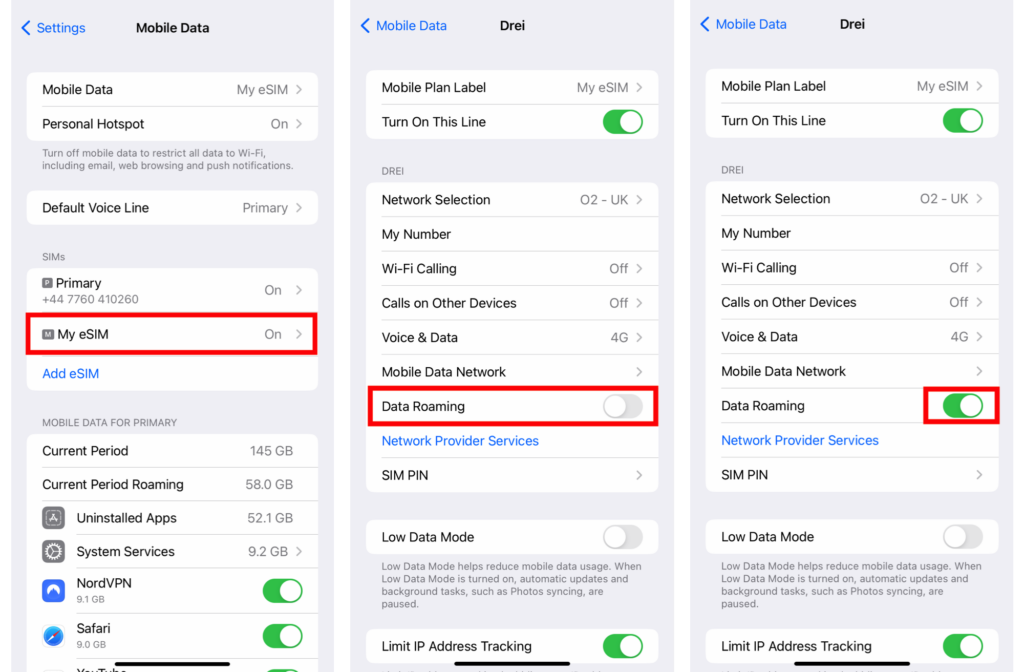
When you’re ready to start using your SimitEasy eSIM, complete the following steps:

  1. Open Settings.
  2. Tap Cellular or Mobile Data.
  3. Select your SimitEasy eSIM.
  4. Make sure Turn On This Line is enabled.
  5. Turn Data Roaming On for your SimitEasy eSIM.
  6. Open your Primary SIM settings and disable Data Roaming to avoid unexpected roaming charges from your home carrier.

Once these settings are applied, your iPhone will automatically connect to a supported local network, and your SimitEasy data plan will become active. You’re now ready to enjoy fast and reliable mobile data throughout your trip.

Install on Android

Installing your SimitEasy eSIM on an Android device is quick and only takes a few minutes. We recommend using the QR Code method whenever possible, as it’s the fastest and simplest way to complete the setup.


Install Using a QR Code

Step 1

After purchasing your eSIM, you’ll receive a QR Code by email and in your SimitEasy account.

There are two easy ways to install it:

Option 1

Open the Camera app on your Android device and scan the QR Code. If your phone recognizes the code, tap Add eSIM or Add Mobile Plan to begin the installation.

Option 2

If scanning with the Camera app doesn’t work:

  1. Open Settings.
  2. Go to Connections or Network & Internet.
  3. Select SIM Manager (or SIM Cards, depending on your device).
  4. Tap Add eSIM.
  5. Scan your SimitEasy QR Code.

Your device will begin downloading the eSIM profile automatically.


Manual Installation

If you’re unable to scan the QR Code, you can install your eSIM manually.

  1. Open Settings.
  2. Navigate to Connections → SIM Manager → Add eSIM.
  3. Choose Enter Activation Code or Enter Details Manually (the wording may vary depending on your device).
  4. Enter the SM-DP+ Address and Activation Code exactly as provided in your SimitEasy order confirmation.
  5. Follow the on-screen instructions to complete the installation.

Once the setup is complete, your eSIM profile will be added to your device.

Step 2

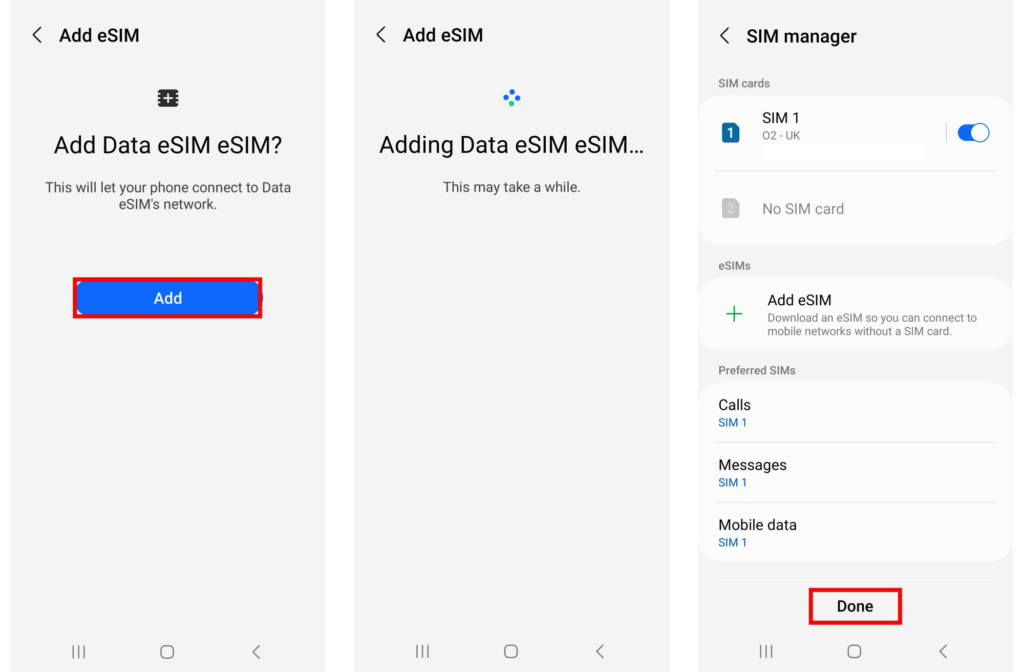
After scanning the QR Code or entering the activation details manually, your Android device will display a confirmation screen.

Tap Add (or Download, depending on your device) to begin installing the eSIM.

The installation usually takes just a few minutes. Once it’s complete, tap Done to finish the process.

Your SimitEasy eSIM is now installed and ready for configuration.

Step 3

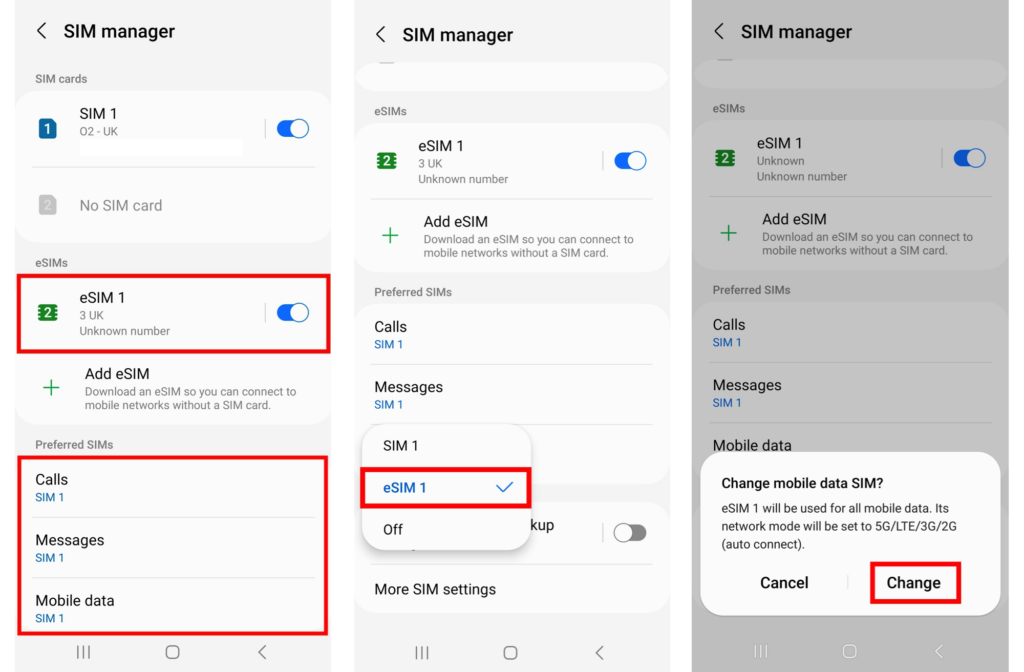
Activate Your eSIM

Before using your eSIM, you’ll need to configure a few network settings.

  1. Open Settings.
  2. Go to Connections → SIM Manager.
  3. Enable your SimitEasy eSIM if it isn’t already turned on.
  4. Set your SimitEasy eSIM as the preferred line for Mobile Data.
  5. Confirm the change if prompted by your device.

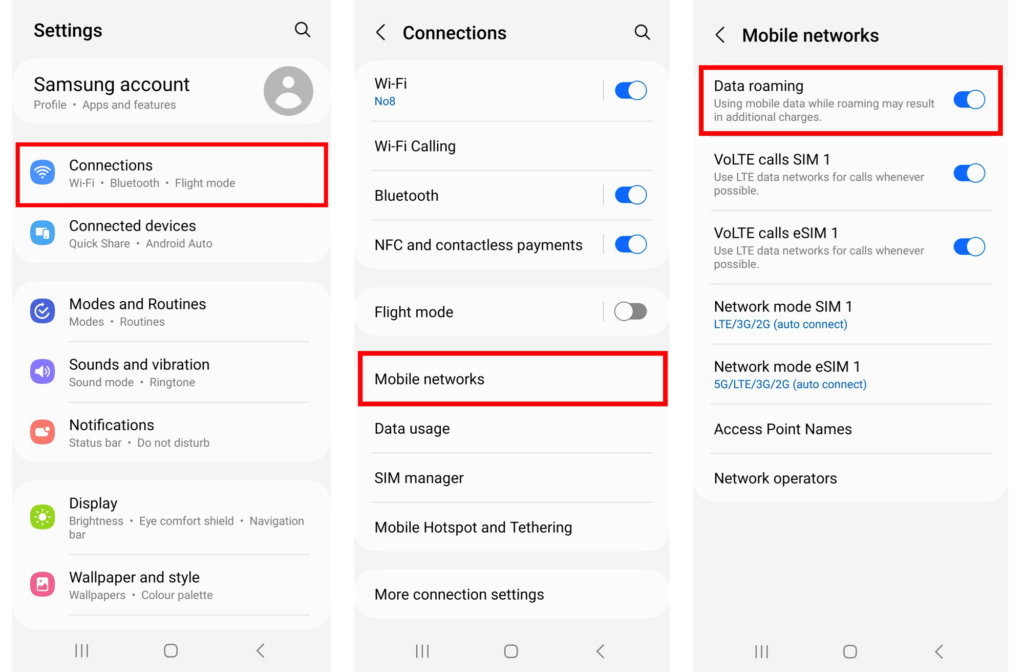
Enable Data Roaming

To connect to local partner networks while traveling, Data Roaming must be enabled for your SimitEasy eSIM.

  1. Open Settings.
  2. Go to Connections → Mobile Networks.
  3. Turn Data Roaming On for your SimitEasy eSIM.

If you’re also using your primary SIM card, we recommend disabling Data Roaming for your home carrier to avoid unexpected roaming charges.

Once these settings are applied, your Android device will automatically connect to a supported network when you arrive at your destination, and your SimitEasy data plan will become active.

Tip:
We recommend installing your eSIM before you travel while connected to Wi-Fi. Your data plan won’t activate until your eSIM connects to a supported network at your destination, so you can prepare everything in advance with confidence.